- Old piece of furniture
- butter knife (totally professional tool I know - but it works!)
- flat-head screw driver
- pliers
- staple gun
- hammer
- sewing machine
- regular and zipper foot
- seam ripper
- upholstery fabric
- plastic piping
- iron
I'm not a pro at this by any means (in fact this was my first attempt), but here's what worked:
The basic rule of thumb is that you work one section at a time, take off the old fabric in whole pieces, then use those pieces as a pattern for your new pieces. Pay attention to how things come off - because you'll put the new pieces back on the same way.
1) Remove Staples:

Starting from the bottom of the furniture, remove the staples using your butter knife, flat-head screw driver, and pliers (safety goggles are a good idea). Remove bottom covering (keep aside until later), and release the rest of the fabric from the bottom of the furniture frame.
2) Remove Fabric Section:

In this case I began by loosening the side sections and removed the back piece of fabric from the chair frame (put aside with metal stretchers), and then removed the lower-front section of fabric, saving any pieces of piping that also had to come off. If any piece is sewn directly onto the furniture, you may need a seam ripper to release it.
 3) Iron Out Old Fabric Section & Trace:

Once I had the fabric piece removed I ironed it flat, and then traced it out exactly onto my new fabric. Cut out new fabric piece. (If you're using patterned fabric - make sure you have your piece in line with the direction of the fabric pattern before cutting it out)
4) Attach New Fabric Piece:
Place new fabric piece on furniture frame in place of the old one and sew/ staple to frame in the same manner as the old one.


5) Repeat with other sections:After replacing the lower-front piece, I worked on the sides next. In this case the side pieces consisted of 1 whole jacket composed of several pieces sewn together. I removed the entire jacket and used my seam-ripper to detatch the pieces from one another.
 Then I ironed each piece out, traced it out onto my new fabric, sewed them back together in the same way, replaced the jacket onto the side of the chair and stapled into position on the frame.
**************************************************
Piping:
To make piping:
1) Remove plastic piping from old fabric sleeve (if piping cannot be re-used, cut a new piece of piping to the same size).
2) Cut a piece of new fabric long and wide enough to make a new sleeve for the piece of piping. Fold in half lengthwise and iron to crease. Sew sleeve just narrow enough to fit piping snuggly.


3) Insert piping.

4) Sandwich between right sides of fabric pieces with piping on the inside - raw edge to the outside and pin in place.

5) Sew pieces together using a zipper-foot on your sewing machine.

*********************************************************
After I completed the sides, I repeated the process with the upper-front section, and then the back piece.


*************************************************************
Using Fabric Stretchers:
Again the rule here is put it back on the way it was, so take careful note when you pull it off. Position fabric stretchers on back side of fabric pointy side down, and poke through material.
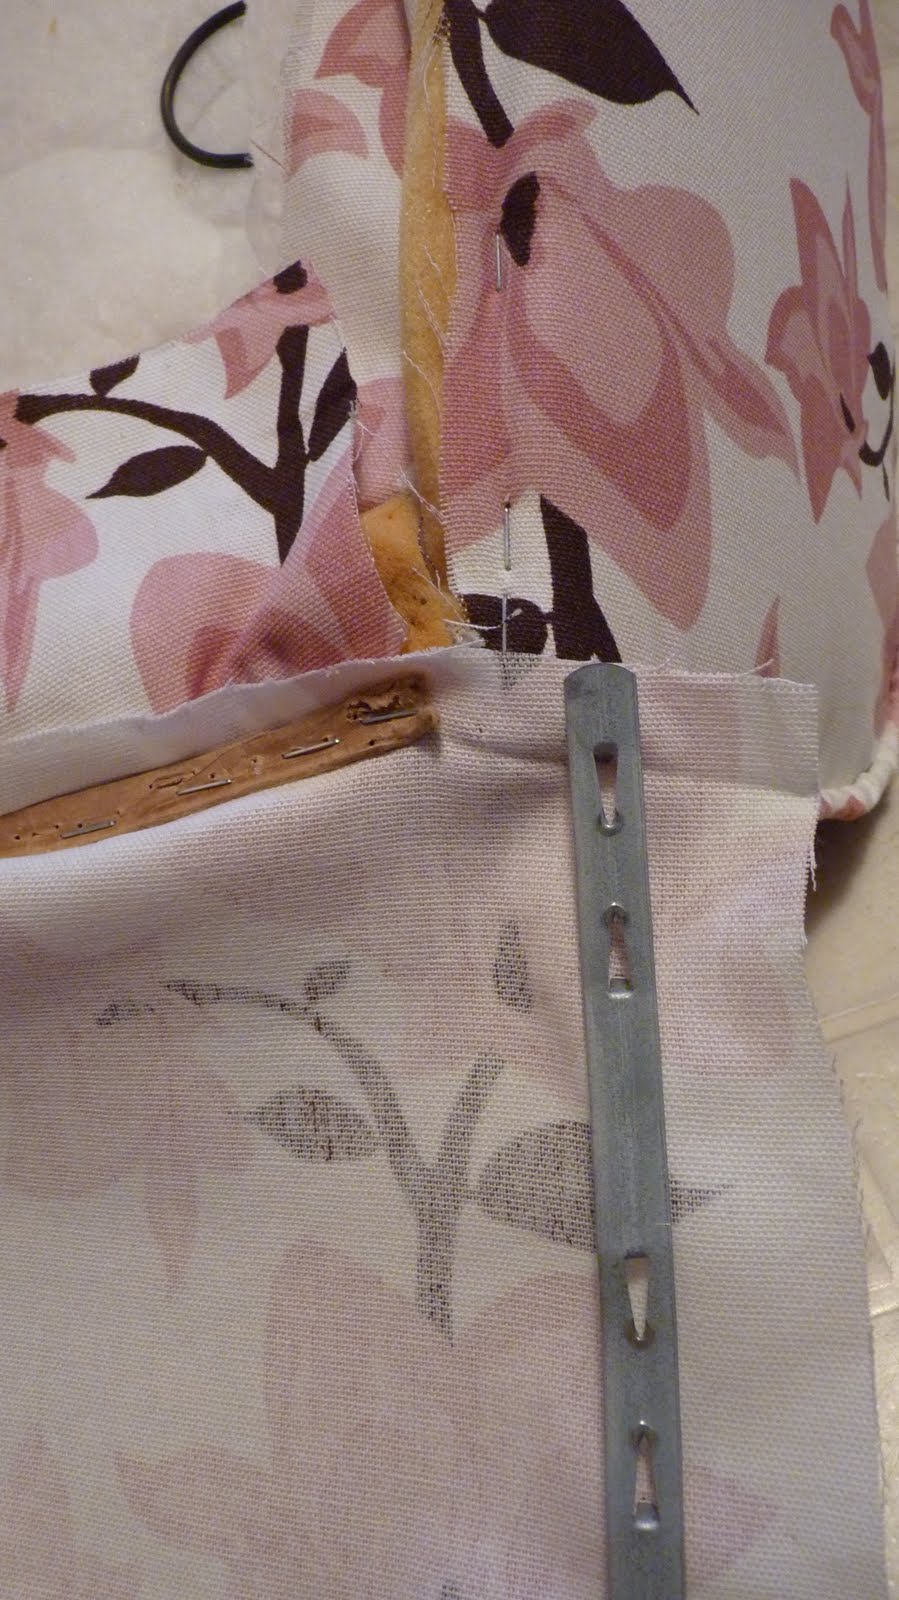 Fold fabric over, position on frame firmly (right side up) and hammer in, stretching fabric across the back.

***********************************************************
6) Replace Bottom Covering:

Staple bottom covering onto furniture frame the way it was - tucking in any loose ends.
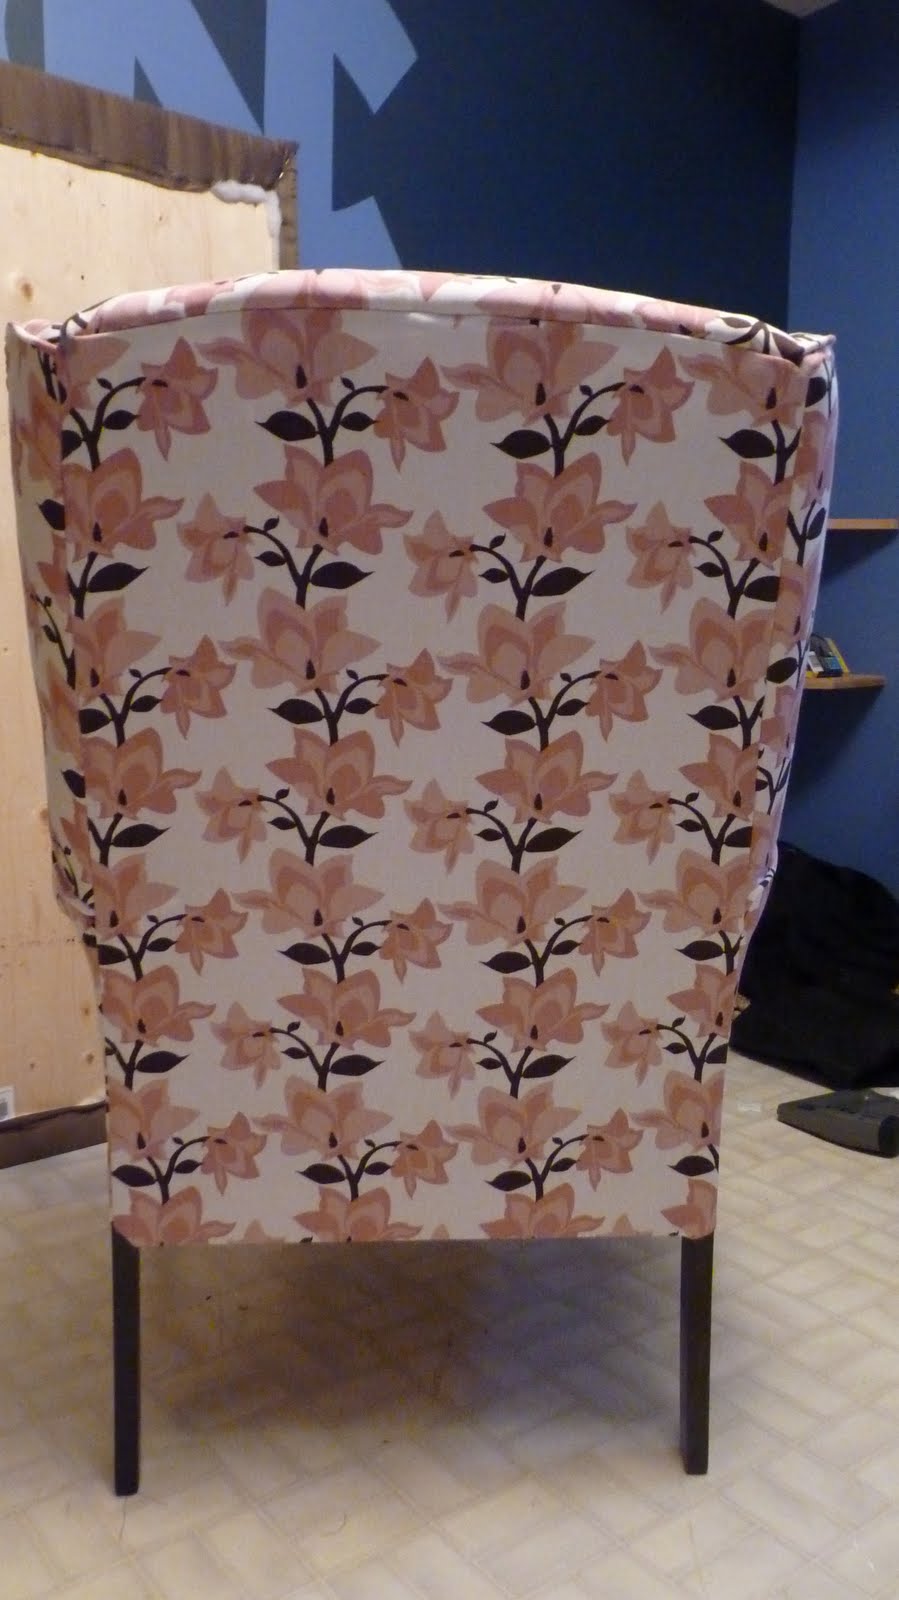
7) Enjoy your "new" furniture!

If you liked this post - check out this one too for more details and better pictures on the reupholstering process:


you make it look so easy! now i want to buy a chair and re-upholster it!
ReplyDeleteThis is great! I have a wingback chair that needs a desperate makeover.
ReplyDeleteHow many yards of replacement fabric would you suggest on getting?
ReplyDeleteIt really depends on your furniture piece. This particular chair took about 6 meters.
DeleteHi Jessica,
ReplyDeleteI didn't need to replace or add foam to this particular chair, but I have on other pieces of furniture. You can typically purchase foam, or other types of padding at fabric stores and cut it to shape - or, better yet, go to a business that specializes in furniture foam. Here in Lethbridge, AB I use Ducan Industries who will custom cut pieces of foam of whatever width and density you want. You can even take them the old piece and they can use it as a template to make you a new one - and all at a very reasonable price! I would do some looking around in your community to see if there is a business that offers a similar service. Good luck!
Hi....so pleased to have found this step-by-step demo. I have a wing-back, very much like this one, that holds sentimental value for me. However, it is so showing its years. Now, I almost feel brave enough to try to re-cover it myself!
ReplyDeleteAmazing. I have piece that I need to Reupholstering but I'm so afraid. But after your tutorial I'm going to give me a chance.
ReplyDeleteThanks great tutorial!
Great tutorial but I am still having trouble getting up the courage to pull of all the old fabric. I got a chair from my friends mother as a wedding gift that already needed some tlc. I have had it for over 6 years in need of repair and can't get the courage to do it. Love the new fabric you used! It's beautiful!
ReplyDeleteI agree... I would love to take on a project like this.. but the failure-factor keeps me from trying... that and I am curious how many labor hours were committed to this project?
DeleteLove your step by step instructions. I would love to tackle a harder re-upholstery project, but I have a suggestion: I've sewn HUNDREDS of yards of welting, and it is MUCH easier to cut the strips 2" wide, fold over welting and sew with a zipper foot, creating it as you go.....Yo
ReplyDeleteYes! I've actually switched to using thick venetian blind cording for upholstery piping (much more flexible than the plastic stuff) - don't know if that's the same as welting, but it is much better to sew it just as you described!
DeleteHow long did this project take? I am wondering if I can get the project done in a day or if I need to give myself more time.
ReplyDeleteYou might be able to get it done in one very long day, but I would suggest breaking it up into a couple days (more if you're also refinishing the wood). Pulling the staples and releasing the fabric is the most tedious/time-consuming part - once that's done, it goes fairly quickly.
DeleteI just ran across this Renaissance wax tonight. He is using it on a pistol, but it is sold and imported from England by a furniture restoration company. It is used by museums around the world.
ReplyDeleteHere http://tinyurl.com/ctgb3yr
Here http://tinyurl.com/d2nh8aq
Enjoy
Jim
Have you tried a channel back chair yet? I have two that I would love to attempt, but am a little bit unsure if I should tackle it.
ReplyDeleteNo, I have not as of yet attempted to re-upholster a channel back chair. Some types of upholstery are a little more advanced, like the channel back, or even a really deep, folded tufting. I would be tempted to practice on something else before taking it on.
DeleteThis comment has been removed by the author.
ReplyDeleteOlá, estou te seguindo... Amei este post, já vou reformar meu sofá!!!! venha nos visitar!!!! tchau!!
ReplyDeleteAbout how many yards of fabric did this chair require?
ReplyDeleteabout 6 yards.
Deletethank you very much for this tutorial! i was given 2 chairs i really like, but they're lime green. nobody will let me bring them into the house. now i can make them a pretty color and won't let anyone (all those snobs that made me keep them in the garage) sit in them.
ReplyDelete... Thankyou for the Best info on recovering furniture ... I am going to be busy finishing many projects now that I understand better the process... Many Thanks from Magrath...
ReplyDeleteI'm a little confused about the zipper foot & piping. Is the zipper foot a sewing option on your sewing machine? Also the fabric stretchers, are those already in the furniture & you just have to take them out & put them back?
ReplyDeleteA zipper foot is a separate attachment for your sewing machine. It comes standard with most sewing machines and looks a little different from your regular foot. learn more here: http://sewing.about.com/od/machinefeet/p/zipperfoot.htm
DeleteThe fabric stretchers I use are already in the furniture and I did just take them out and put them back on. Hope that's helpful!
I'm so glad I found you. I have been trying to redo a chair for a year now and you have just put me in the the right place. Thank you
ReplyDeletethank you for tutorial - we have a chair exactly like that!
ReplyDeleteLovely clear instructions want to do this one day!
ReplyDeleteSigh, I just paid to have someone do this exact wing-back chair. I wish I had seen this last week! BTW - there is a piping foot that can be bought and using it you could do the piping in one or 2 steps and wouldn't have to push it through. Just a thought.
ReplyDeleteI'm so glad you posted this tutorial. I've had a chair that needs recovering, but too scared to try it myself. I was always afraid I'd wreck it. Now, I just may have some courage to try it on my own or at least with a helper. Thanks so much for the post!
ReplyDeleteYou show us all the easy parts, we already know how to cut, iron and sew or we wouldn't be considering this. How about some details on the stretchers, and what exactly DID you do if the piece was originally sewed directly to the chair. And how exactly did you get fabric tucked down and attached deep in the arm and back attachments? And where did you get the stretchers and exactly how do they work?
ReplyDeleteWhy so bitter?
DeleteNot sure how you read bitterness into this. Doing this for her first time Abby has a perfect opportunity to give us some real insight to the problems and solutions and how to deal with the things we have never seen before. I am asking specific questions with hope that she will address them.
DeleteHi Sharon,
DeleteThe specifics for every piece of furniture will be just a little bit different, but the most important rule is just to pay very close attention to how the old pieces come off - and make sure the new pieces go back on in exactly the same way. As for your specific questions: for fabric that is sewn directly onto the piece - use a seam ripper to take it off and hand-sew the new piece back on the best you can. The stretchers are a little tricky to get the hang of (I re-used the same ones that came off the chair and just put them back on the same way they came off). As far as getting the fabric tucked down and attached - you just have to wrestle with it and find a way to make it work! Re-upholstering is labour intensive hard work - don't be surprised if you break a sweat! As long as you remember to put the new pieces back on the same way the old ones came off, you should be just fine. I have a couple of pieces that I'm hoping to re-upholster for my living room soon, so maybe I'll try to do another post on re-upholstering including more detail and maybe some videos to help show the process more clearly and in more detail. Good luck!
YOU ARE ABSOLUTELY AWESOME! Timing is perfect. I just found this on Pinterest and recently reupholstered 6 dining room chair seats for grandma. Now she wants her rocking arm chair covered also. We all ran away from it because it seemed too hard but now I have the courage to try. THANK YOU SOOO MUCH FOR SHARING!
ReplyDeleteYou did a nice job! Just a tip, you can make cording by folding your narrow piece of fabric over the cord and stitching close using the zipper foot. Saves a step and you can make all your cording at once, cut to length, and just remove some of the cord when it needs to be in a continuous loop.
ReplyDeleteNot all upholstery projects lend themselves to removing and replacing one section at a time. This is true especially if you have to replace old foam, mend springs etc. Relying on my aging memory is another reason I have resorted to documenting step by step removal of fabric sections with digital photos that include closeups of tricky areas. I review the photos on my computer for reminders but you could also leave them in your camera for quick onsite reviews. Label the old sections with a Sharpie marker as you remove them - ie. where they belong and use arrows to indicate up, down, back or front edge of each piece. These extra steps can save you big in time, labor, materials and unnecessary frustration.
ReplyDeleteGreat idea, I forget how easily I forget. Also, my projects can be spaced out longer than anticipated and memory sure would appreciate this boost. Thanks
DeleteGreat idea, I forget how easily I forget. Also, my projects can be spaced out longer than anticipated and memory sure would appreciate this boost. Thanks
DeleteI'd like to know how to reupholster a chair with wooden hand pieces and wooden wing pieces. Its annoying to look at our ugly orange chair and not know how to upholster around those pieces!
ReplyDeleteStay tuned! I'm just about to re-do some chairs for my living room that have that exact same dilemna, and will be posting a tutorial on it as soon as I finish!
Deletewhere can you buy new fa love fabric stretchers?
ReplyDeletegreat tutorial. very easy to follow.
what a good job you have done, the chair looks so different now. I will definately try this, i have just the chair waiting for an update like this
ReplyDeleteWOW! I have 2 chairs that I could totally do. HMMM...I think I may round up the supplies and TRY!
ReplyDeleteThank you for sharing this! I wonder if there are any places that do furniture upholstery in Phoenix? Do you have any suggestions?
ReplyDeleteCan you tell me how to get buttons off and replace them? I have a piece that I have wanted to redo but removing the buttons has me reluctant to do it.
ReplyDeleteHi Sharon,
DeleteTo remove a button usually you would just yank on the button until the cord is exposed and then snip it. If it is a fabric covered button, you will have to purchase a fabric covered button kit (available at any fabric store) with enough buttons to replace the old ones. Once you have created your new buttons, you will need some upholstery thread, and an extra long needle to re-attach the buttons (just put them back exactly where and how they were attached before you removed them). Usually they are attached to a series of woven straps inside the back of the furniture. I will be illustrating this process soon on a couch that I am currently working on.
Intriguing! I have two vintage Eames pod chairs that desperately need face lift. I'm wondering if it's even possible by these more conventional methods.
ReplyDeleteThere is certainly a lot to find out about this subject. I like all the points you made.
ReplyDeleteInterstate removalist sydney
I have a wing back rocker that I want to re-upholster. Please do a tut on that!!!
ReplyDeleteI have a sectional couch and my husband wants to get rid of it, but I love the unique structure! Do you think it is too big of a project to do a sectional? Have you done one?
ReplyDeleteI am currently working on a couch - but I haven't done a sectional. It would be a big project - but if you love the couch it might be worth it! The nice thing with a sectional, is that depending on how it splits up you may be able to take it one section at a time which would help to split up the work. I would probably shop around first, and see if there's something new that you really love. If you can't find something new that you like more, than it might be worth tackling it!
DeleteNice post with great details. I really appreciate your job. Thanks for sharing this great idea. hospitality furniture manufacturers
ReplyDeleteThis comment has been removed by the author.
ReplyDeleteThanks for this post, I have two armchairs exactly like this,they are only two years old but between 4 cats and a new puppy there are some sections of the fabric that need to be replaced. I was really nervous about trying to do it ourselves but this has inspired me to give it a go.
ReplyDeleteGreat . I have one waiting for me. I stripped the old fabric and now I just need the time to do it. Thanks for the tips.
ReplyDeleteI really wanted to go back in doing upholstery! But I am still afraid of the staple gun after my hand injury because I bought a cheap one. You really need to invest with your tools.
ReplyDeleteHi there,I enjoy reading through your article post, I wanted to write a little comment to support you and wish you a good continuationAll the best for all your blogging efforts.
ReplyDeleteregard
mebel minimlais mebel jati
Would you please provide the link to Part 1? This is an excellent tutorial.
ReplyDeletehttp://do-it-yourselfdesign.blogspot.ca/2011/06/re-uphostering-furniture-part-1.html
DeleteThanks for the ideas your share here
ReplyDeleteSo far, I am looking for a source of reference on various websites
Now I have found what I was looking for all this time
I keep the spirit to strive to be the best, one of which is a reference from your idea that really helped me.
Once again I want to say thank you
rebana jepara mebel jepara furniture jepara
Thank you very much for this! I've got two chairs that need to be reupholstered and none of my friends knew how to do it. Now I'm gonna try it on my own. Thanks.
ReplyDeleteThe information on know how, is a great thing! I really enjoy reading this post, because I already had an idea on how can I re-upholster my old chair. Even without someone who could help, I think by these step by step idea can help a lot to do it my own.
ReplyDeleteA good quality office chair can give you a good posture, letting you to move freely without cramping you up.
ReplyDeletethns infonya
ReplyDeleteI like the idea that you share here and I hope there is a fresh idea that can be shared in the future
ReplyDeleteIf later there was a chance I would like to exchange thoughts with you
Thank you very much for sharing interesting things here
obat pembesar vimax contoh vimax original distributor vimax original ciri vimax palsu
I like the idea that you share here and I hope there is a fresh idea that can be shared in the future
ReplyDeleteIf later there was a chance I would like to exchange thoughts with you
Thank you very much for sharing interesting things here
nokia x samsung galaxy s5 bbm windows phone lenovo golden warrior s8
Thank you for sharing
ReplyDeleteI've been looking for, and it can be an idea from here
I hope to be useful also for other people
Once again I would like to say thank you
fungsi vimax ciri vimax original efek samping vimax palsu contoh vimax palsu
Thanks for sharing. I love most this kind of Blog. I, too, would love reclaimed wood shelves in our study and needed to know how to make them. There are more item of wood and wood institute. I love it very much. I need to know more about wood. So I am searching this kind of blog.
ReplyDeletereclaimed dining table
How do I know how much fabric to buy? I saw the most beautiful fabric at HOBBY LOBBY the other day. I have two Queen Ann Lazyboy recliners to do.
ReplyDeleteThanks for sharing. I love most this kind of Blog. I, too, would love reclaimed wood shelves in our study and needed to know how to make them. There are more item of wood and wood institute. I love it very much. I need to know more about wood. So I am searching this kind of blog.
ReplyDeleteObat Pembesar Penis
Thanks, I am glad to read your topic and could participate comment here
ReplyDeleteI keep visiting your blog every day to find out the latest topics that you share here
Glad to be begabung here, salute
If there is a turning please visit my blog
Vimax
Vimax Asli
Vimax Canada
Obat Vimax
These are very useful DYI tips for upholstery cleaning at home.
ReplyDeleteIt’s amazing in support of me to truly have a web site that is valuable meant for my knowledge.mycomputergamingchair.com
ReplyDeleteHi guys, I really enjoyed your blog it was quite inspirational, keep posting!
ReplyDeletepersonal loans
Keep the ball rolling you have done the great job here.
ReplyDeletelife insurance quote
I have actually bookmarked your site because I truly love this knowledgeable source of information. Thanks auto insurance quotes
ReplyDeleteThank you for sharing
ReplyDeleteI've been looking for, and it can be an idea from here
I hope to be useful also for other people.
VIMAX
VIMAX ASLI
CIRI VIMAX ASLI
VIMAX CANADA
AGEN VIMAX ASLI
VIMAX ASLI CANADA
OBAT PEMBESAR PENIS
VIMAX DI MEDAN
VIMAX DI MEDAN
You have really discussed several good points here. I did a little search on your website and got that majority of the people are agree with your blog. electrician Columbia
ReplyDeletePlease, will you really post some more things about the same issue; I am actually a great fan of your blog... Urbandale carpet cleaners
ReplyDeleteI truly appreciate your working guys, thumbs up!! Auto repair Aurora Illinois
ReplyDeleteSuper-Duper blogs! I love it really!! Would come back to visit soon, again Thanks. kitchen designers Moore
ReplyDeleteUsed to do appreciate reading through content articles submitted on this website. They're amazing and it has lots of helpful info.
ReplyDeleteFurniture UK
I did a pinterest search on re-upholstering chairs after being again embarrassed by my sheet covered sturdy wing back chairs (2). There was your post. An answer to a decorating prayer. Wish me luck as I head out for some beautiful fabric and a new staple gun and dive in. Thanks for all your ideas.
ReplyDeleteI did a pinterest search on re-upholstering chairs after being again embarrassed by my sheet covered sturdy wing back chairs (2). There was your post. An answer to a decorating prayer. Wish me luck as I head out for some beautiful fabric and a new staple gun and dive in. Thanks for all your ideas.
ReplyDeleteYou are amazing. I love it. Great job!
ReplyDeleteYou are amazing. I love it. Great job!
ReplyDeleteI am very impress on your information. We can make our Upholstery looks like new by just changing fabric. Fabric quality and colors are also very important. You can Buy best upholstery fabric from here.
ReplyDeleteRe-Upholstery Service Singapore
This is a really good read for me. Must agree that you are one of the coolest blogger I ever saw. office cubicles in miami
ReplyDeleteI'm so glad you posted this tutorial. I've had a chair that needs recovering, but too scared to try it myself.Thanks so much for the post!
ReplyDeleteNice blog. Thank you for sharing. Best Boat Upholstery in USA
ReplyDeleteI am very impressed by the time and detail taken to produce this article. This is what the 'net' should be. Thanks.
ReplyDeletethay mặt đá tủ bếp
sửa chữa cửa gỗ tại nhà
ghế chân quỳ giá rẻ
sơn đồ gỗ tại nhà
Very nice and informative post. Thanks for sharing. used office cubicles ft lauderdale
ReplyDeleteUsually I never comment on blogs but your article is so convincing that I never stop myself to say something about it. You’re doing a great job Man, Keep it up. Affordable Boat Upholstery FL
ReplyDeleteBoat seat covers in USA
THANK YOU for his article bro, this is very helpful and useful
ReplyDeleteI hope to see your other articles
Obat Pembesar Penis
Hammer Of Thor
Hammer Of Thor Asli
Extenze
Extenze Asli
Fortune Oriental Holdings Limited (FOH) LLC, is a licensed furniture manufacturer that has been registered
ReplyDeletein both Hong Kong and mainland China since 2007.
foh furniture home office furniture online. Restaurant furniture suppliers usa.
executive furniture in china.furniture companies in dubai.FOH is a leading global furniture provider in the commercial furniture industry.
Wow.. Its wonderful article. very useful information. Thanks for your sharing.
ReplyDeleteFurniture Manufacturers in Coimbatore
Hotel Furniture Manufacturers in Coimbatore
Impressive and powerful suggestion by the author of this blog are really helpful to reduce our hack-tic life. My own views are matching with author and I have experienced such. Brown Leather Armchair Chair with Metal
ReplyDeleteVery nice info given in this blog.We are Restaurant furniture suppliers Dubai,USA,China. We always provide excellent, professional service to global buyers with our high-quality products, and our focus is on the customer.
ReplyDeleteoffice furniture suppliers Dubai,executive furniture in usa,office furniture suppliers China.We have Restaurant Furniture Stores Dubai,USA,china.
ReplyDeleteEnjoyed reading the article above, really explains everything in detail, the article is very interesting and effective.Thank you and good luck for the upcoming articles. Affordable Boat Upholstery USA
Florida Boat Upholstery
eco park viewecopark viewchung cư eco park viewdự án eco park viewchung cư duy tânchung cư 19 duy tân19 duy tântiến độ eco park viewmặt bằng eco park viewbảng giá eco park view
ReplyDeleteThis comment has been removed by the author.
ReplyDeleteThankyou for sharing this article really nice article, Visit: Furniture Manufacturers
ReplyDeleteHow much did it cost to Get the fabric for this piece
ReplyDeleteThanks for sharing this amazing information with us.
ReplyDeleteI really appreciate it.
Wooden Interior Doors
Thanks you,
ReplyDeletePleas read my blog?
Ilmupeternakan.web.id
Fredikurniawan.com
A wide range of antiques furniture from France
ReplyDeletewhich are mostly made of an oak wood. In our offer you can find both antique furniture and furniture stylized according to the design of various historical periods Louis Philippe.
There is a possibility of transport offered by our local courier..
To know more check at ebay : Steven Daniel
Wow… nice post here, Who Are You? Where are you from? I 'd like to read more to your next post.Please keep continue.Thanks form Weronika
ReplyDeleteservice
ReplyDeletekursus
kursus
Elektronika
Bisnis
lampung
lampung
kursus
Good work, Well detailed and explained by the author. Hoping that it will inspire more readers. Thank you for sharing this author. Randomly, reupholstery services Singapore our company offers service at a very affordable price, feel free to visit our website if you are interested. Thank you and God bless!
ReplyDeleteGood work, Well detailed and explained by the author. Hoping that it will inspire more readers. Thank you for sharing this author. Randomly, reupholstery services Singapore our company offers service at a very affordable price, feel free to visit our website if you are interested. Thank you and Godbless!
ReplyDelete
ReplyDeleteTalking about reupholstery services Singapore was another thing that I must be knowledgeable enough since I wasn’t really care about it.
Colors that are neutral and paired with neutral pattern types are easier to use in many types of rooms, and seem to be in style longer. furniture restorers nyc
ReplyDelete
ReplyDeleteTalking about reupholstery services Singapore was another thing that I must be knowledgeable enough since I wasn’t really care about it.
Furniture upholstery saves you more money as compared to buying new furniture. Reupholstery services in Singapore is very famous and one of the companies who can give you a very excellent re-upholstery service is cotton ware. Where they can make your old and shabby sofa into a new one.
ReplyDeleteSofa upholstery is not just a budget friendly but also an eco friendly .
ReplyDeleteCotton ware offers Cheap Upholstery Service. Where at a very low price you will see your shabby and old sofa turn into a new one.
ReplyDeleteImmediately if you buy a new house, you will observe that you need a new set of sofa to make your house complete. If that is the case you don’t have to buy a new one instead look for a Sofa Reupholstery professional. Like Cotton ware who offers a very good quality sofa re-upholstery service
ReplyDeleteVery interesting blog Awesome post. Your article is really informative and helpful for me and other bloggers too.
ReplyDeleteSofa in UK
ReplyDeleteThanks for sharing the best and informative article.
Buy wing chair online
Furniture upholstery saves you more money as compared to buying new furniture. Reupholstery services Singapore is very famous and one of the companies who can give you a very excellent re-upholstery service is cotton ware. Where they can make your old and shabby sofa into a new one.
ReplyDeleteCotton ware offers a high quality and affordable Upholstery Service
ReplyDeletewhere it will suit your style in a very affordable price.
Cotton ware offers a high quality and affordable Upholstery Servicewhere it will suit your style in a very affordable price.
ReplyDeleteImmediately if you buy a new house, you will observe that you need a new set of sofa to make your house complete. If that is the case, you don’t have to buy a new one instead look for a Sofa Reupholstery professional. Like Cotton ware who offers a very good quality sofa re-upholstery service
ReplyDeleteCotton care offers a not just a budget friendly but also an eco friendly .sofa cleaning service
ReplyDeleteIs your sofa torn or worn out? Don’t worry! You don’t have to dispose of it. Cotton Ware reupholstery services Singapore has come to your aid. We are experts at turning shabby chairs and sofa to look as if you bought them.
ReplyDeleteCheap Upholstery Service saves you more cash than buying new furniture.
ReplyDelete
ReplyDeleteSofa Upholstery is the work of providing furniture, especially seats, with padding, springs, webbing, and fabric or leather covers.
The curtains and fabrication service Singapore is an aggregate presentation of the building type of window cover.
ReplyDeleteThe word upholstery comes from the Middle English word upholder, which referred to an artisan who held up their goods. Cheap Upholstery Service is not just a budget friendly but also an eco friendly .
ReplyDeleteHello, Thanks for sharing your info. I really appreciate your efforts and I will be waiting for your further write ups thanks once again.
ReplyDeleteFabric sofa in UK
Cheap Upholstery Service is the job of providing padding, springs, webbing, and cloth or leather covers for furniture, particularly seats.
ReplyDeleteNice Hotel furniture manufacturers blog and I will share to my friends. Also I suggest Hotel furniture suppliers.
ReplyDeleteCompared to buying new furniture, more time is saved by furniture upholstery. Sofa Upholstery is very popular and cotton ware is one of the companies that can offer you a very nice product of re-upholstery. Where it is possible to turn the rusty shabby couch into a new one.
ReplyDeleteIs your sofa torn or worn out? Don’t worry! You don’t have to dispose of it. Cotton Ware reupholstery services Singapore has come to your aid. We are experts at turning shabby chairs and sofa to look as if you bought them.
ReplyDeleteCheap Upholstery Service is the work of providing furniture, especially seats, with padding, springs, webbing, and fabric or leather covers.
ReplyDeleteCushion Upholstery sells cotton furniture. Where your shabby and outdated couch would turn into a new couch at a very low price.
ReplyDeleteImmediately if you buy a new house, you will observe that you need a new set of sofa to make your house complete. If that is the case, you don’t have to buy a new one instead look for a Sofa Upholstery Singapore.
ReplyDeleteIs it torn and tired off your couch? Don't be afraid! You don't need to get rid of it. Cotton Ware reupholstery services Singapore have come to your assistance. We are specialists at transforming shabby furniture and sofa to appear like you've bought them.
ReplyDeleteCheap Upholstery Service is the work of providing furniture, especially seats, with padding, springs, webbing, and fabric or leather covers.
ReplyDeleteIs it torn and tired off your couch? Don't be afraid! You don't need to get rid of it. Cotton Ware reupholstery services Singapore have come to your assistance. We are specialists at transforming shabby furniture and sofa to appear like you've bought them.
ReplyDelete
ReplyDeleteFurniture upholstery saves you more money as compared to buying new furniture. Sofa Upholstery is very famous and one of the companies who can give you a very excellent re-upholstery service is cotton ware. Where they can make your old and shabby sofa into a new one.
Is your sofa torn or worn out? Don’t worry! You don’t have to dispose of it. Cotton Ware reupholstery services Singapore has come to your aid. We are experts at turning shabby chairs and sofa to look as if you bought them.
ReplyDeleteWhen you buy a new house right away, you'll find that you need a new set of sofa to complete your home. If that is the case, instead of searching for a Sofa Upholstery Singapore, you don't have to buy a new one. Like Cotton furniture, which provides a very good quality replenishment sofa system
ReplyDeleteFurniture upholstery allows more capital than modern furniture to be bought. Upholstery furniture is very expensive, and cotton ware is a business that can offer you a beautiful Sofa Upholstery. Where it is possible to turn discarded shabby furniture into a new couch.
ReplyDeleteCotton ware offers Cushion Upholstery. Where at a very low price you will see your shabby and old sofa turns into a new one.
ReplyDeleteWas it ribbed and weary in your couch? Do not be frightened! Do not be frightened! Don't be frightened! Don't be afraid! You must not get rid of it. You must not get out. For Cotton Ware reupholstery services Singapore, Singapore has been here. We are experts to look as though you bought them when transforming shabby furniture and sofa.
ReplyDeleteIs it torn and tired off your couch? Don't be afraid! You don't need to get rid of it. Cotton Ware reupholstery services Singapore have come to your assistance. We are specialists at transforming shabby furniture and sofa to appear like you've bought them.
ReplyDeleteIs your couch ribbed and tired? Don't be scared! Don't be scared! You mustn't get rid of it. Singapore has come to your assistance for Cotton Ware reupholstery services Singapore. In converting shabby furniture and sofa we're experts to look like you've purchased them.
ReplyDeleteCompared to buying new furniture, more time is saved by furniture upholstery. Sofa Upholstery is very popular and cotton ware is one of the companies that can offer you a very nice product of re-upholstery. Where it is possible to turn the rusty shabby couch into a new one.
ReplyDeleteFurniture upholstery allows more money compared to buying modern furnishings. Furniture Upholstery is very popular and cotton ware is a business which can sell you a beautiful Sofa Upholstery. Where the existing shabby furniture can be turned into a new couch.
ReplyDelete
ReplyDeleteCheap Upholstery Service is the work of providing furniture, especially seats, with padding, springs, webbing, and fabric or leather covers.
All of this that you do is absolutly fantastic and you really explain everything well. i will defenitly try this i love it
ReplyDeletethank you so much for this Blog
Fabric sofa in UK
i am very glade to read your article its provide me knowledge & info about
ReplyDeleteoffice Chair best
Hey Sarah, thank you for stopping by and sharing your feedback.We're glad you loved reading our blog. Keep watching this space for more.
ReplyDelete“Bespoke sofa in UK”
Such a nice idea of re-upholstering furniture.This is really nice idea to reuse the goods.I love you idea and the way you present this.
ReplyDeleteCustom boat Upholstery in Florida
Affordable Boat Upholstery USA
Awesome post.....Thanks For the great Info....
ReplyDelete“Corner sofa”
Reupholster sofa Dubai
ReplyDeleteThe best Upholstery in Dubai, we also do sofa repair upholstery for couches, beds, outdoor patio furniture and chairs repairing, cushion foam change and refilling
This is wonderful! I really like your choice of fabric used for this furniture. We at Upholstery Atlanta take inspiration from posts like these.
ReplyDeleteThank you for sharing!
Nice blog dear I like the way as you present your view among the all visitors. Thanks,
ReplyDeleteFabric sofa
What an wonderful post. Thank you for the post. office furniture Miami.
ReplyDeleteThey could also be equipped to be produced from cowhide or different common materials. the place to Sofa Upholstery Repair In Abu Dhabi the assortment of couches is terrific, and it is enormously effortless to choose anything character from this legit form.
ReplyDeleteThank you for sharing this information. The information was very helpful!! Boat Upholstery USA
ReplyDeleteThe Cheap Upholstery Service provides covering, webbing and cloth or leather covers, particularly seats. There's padding open.
ReplyDeleteCheap Upholstery Service is not just a budget friendly but also an eco friendly.
ReplyDeleteCotton ware Roller Blinds are the best!
ReplyDeleteRoller Blinds
ReplyDeleteThis article is really the one that I needed. I really learned a lot by reading the whole content. Thanks for this.
ReplyDeleteFabric sofa
Furniture upholstery saves you more money as compared to buying new furniture. Sofa Upholstery is very famous and one of the companies who can give you a very excellent re-upholstery service is cotton ware. Where they can make your old and shabby sofa into a new one!
ReplyDeleteAre your windows at home or office look plain and odd? And tired of finding shops that can offer good and quality services? Worry no more, cotton ware is here to help you in your roller blinds fabrication. Here, you can observe excellent and quality services that cotton ware can give to you.
ReplyDeleteFor More Information Visit Here -- Upholstery
ReplyDeleteHigh quality upholstery for sofa in Dubai, we do furniture repair chairs and change cushion foam.
Hello I found a interesting article regarding furniture relocation. Here they have explained all the points about how to relocate big furniture without getting any damages. Check it out. I am adding the link here. Thank you. https://shiawase-home.com/how-to-relocate-big-furniture-with-proper-safety/
ReplyDeleteFurniture upholstery Dubai
ReplyDeleteThe best Upholstery in Dubai, we also do sofa repair upholstery for couches, beds, outdoor patio furniture and chairs repairing, cushion foam change and refilling"
Wow!! Thanks for sharing this information with us about Upholstery. Keep posting.
ReplyDeleteTalking about reupholstery services Singapore was another thing that I must be knowledgeable enough since I wasn’t really care about it.
ReplyDeleteUpholstery
ReplyDeleteThe best Upholstery in Dubai, we also do sofa repair upholstery for couches, beds, outdoor patio furniture and chairs repairing, cushion foam change and refilling"
There is something in your article that I would recognized that it caught my attention about curtains and fabrication service Singapore in this matter I was really not interested but you did change my perception.
ReplyDeleteI really Like your article, Leather Corner Sofa
ReplyDeleteThis comment has been removed by the author.
ReplyDeleteThis type of door is made from two sheets of galvanized steel up to 0.8 mm thick with a core of honeycomb paper. This type of fire door resists smoke and high temperature of fire has been tested according to standard, withstanding time is 1 hour. Cua thep chong chay |
ReplyDeleteThere was something in your article that piqued my interest about reupholstery services Singapore. I was previously uninterested in this subject, but you changed my mind.
ReplyDeleteTalking about reupholstery services Singapore was another thing that I must be knowledgeable enough since I wasn’t really care about it.
ReplyDeleteIt is very informative article about upholstering furniture. I really appreciate your efforts. Keep it up....
ReplyDeleteinterstate removalists sydney to perth
I don’t have any concept approximately curtain fabrication services then lately i used to be curious approximately it so my pal advised me to do a little readings like blogs or articles then i used to be amazed due to the fact I’m studying now an astounding article.
ReplyDeleteTalking about reupholstery services Singapore is another thing I should know, because I wasn’t really care about it
ReplyDeleteTalking about reupholstery services Singapore in Singapore was another thing I needed to be very knowledgeable about as I didn't really care.
ReplyDeleteNice Work. Thanks for sharing.
ReplyDeleteAntique furniture Restoration NYC
We fulfill your need of Tub, Wings, Dining & Antique Chairs at reasonable cost along with French Polishing in Mornington Peninsula.
ReplyDeletewings chairs mornington peninsula
Tub chairs mornington peninsula
Talking about reupholstery services Singapore was another thing I needed to be very knowledgeable about as I really don't care.
ReplyDeleteTalking about reupholstery services Singapore turned into every other aspect that I ought to be informed sufficient in view that I wasn’t absolutely care approximately it.
ReplyDelete
ReplyDeleteTalking regarding reupholstery services Singapore was another issue that i have to be knowledgeable enough since I wasn’t very care about it.
There is one thing in your article that i'd recognized that it caught my attention concerning reupholstery services Singapore during this matter i used to be very not interested however you probably did amendment my perception.
ReplyDeleteTalking approximately reupholstery services Singapore become every other issue that I need to be informed sufficient due to the fact that I wasn’t without a doubt care approximately it.
ReplyDeleteTalking concerning reupholstery services Singapore was another issue that i need to be knowledgeable enough since I wasn’t very care about it.
ReplyDeleteThere is something in your article that I would appreciate drawn my attention to reupholstery services Singapore on this matter. I wasn't really interested, but it changed my perception.
ReplyDeleteTalking about reupholstery services Singapore was another thing I needed to be very knowledgeable about because I didn't really care.
ReplyDeleteThere is something in your article that I would appreciate drawing attention to reupholstery services Singapore on this matter. I wasn't really interested, but it changed my perception.
ReplyDeleteThere is some thing in your article that I would recognized that it caught my interest about reupholstery services Singapore in this matter I used to be honestly no longer fascinated however you did trade my perception.
ReplyDeleteI have no idea about the reupholstery services Singapore, but lately I have been curious about them, so my friend recommended that I do some reading like blogs or articles, then I was surprised because now I am reading an amazing article.
ReplyDeleteThere is something in your article that I would recognized that it caught my attention about Reupholstery Sofa Singapore in this count number I was certainly now not fascinated however you did change my perception.
ReplyDeleteI don’t have any concept about reupholstery services Singapore then lately I used to be curious about it so my buddy suggested me to do some readings like blogs or articles then I was amazed due to the fact I’m studying now an remarkable article.
ReplyDelete