
One of the many things that I really loathed about our house when we moved into it was the nasty old, plain, flat wood bi-fold closet doors. I have had my heart set on replacing them ever since we moved in; however, when I priced it out - I just couldn't afford what I wanted!
5-panel Shaker bi-fold closet door I wanted at over $200 each!
So as usual, the wheels in my head started turning: how could I get the look I wanted at a price I could afford??? Do it myself of course! I formulated a plan and decided to try it out as part of my home studio renovation, before I tackled all the closets in the house!
MATERIALS:
- Straight, flat bi-fold closet doors.
- Several feet of straight, flat casing, approx 2.5" wide.
- Wood glue
- DAP (white, paintable silicone)
- Sand-paper
- Primer & paint
- Door handles / pulls and extra-long screws
TOOLS:
- Pencil
- Measuring tape
- Mitre saw
- Micro-pinner (brad-nailer) with 1" brads.
- An extra set of hands is useful!
- Drill
PROCEDURE:
1) Lightly sand front surface of closet doors. Wipe clean with a damp rag.

2) Measure length of closet door and subtract the width of your casing from the bottom and top (length of closet - 5" in this case). Cut as many lengths of casing as you will need for each side of each bi-fold door according to your measurements (in this case, 8).
3) Leaving closet doors in place and working from right to left, place first length of casing in position on the left side of the first bi-fold door (leaving 2.5" at the top, and 2.5" at the bottom). This first one is a little tricky, because you will need to place it slightly away from the left edge of the bi-fold door so that it will not inhibit the movement of the door when it opens and closes (in this case, we placed it .5" in from the left edge of the bi-fold door). When you are confident that you have it in the right position, apply a thin strip of wood glue to the back of the length of casing, and secure it in place on the bi-fold door with your micro-pinner.

4) Your going to do the same thing with your next length of casing on the right side of the first bi-fold door, but this time, you can bring the length of casing right flush to the right edge of the bi-fold door, and secure in place with wood glue and micro-pinner.
5) Start on the left side of the 2nd bi-fold door with your next length of casing, bringing the casing flush to the left edge of the 2nd bi-fold door, and secure in place.
6) Place the next length of casing in position on the right side of the 2nd bi-fold door (flush to the edge) and secure in place.
7) Repeat this process for each bi-fold door, until you reach the right side of the last bi-fold door. Here, you will want to position the last length of casing slightly in from the right edge of the bi-fold door so that it does not inhibit the movement of the door when it opens and closes (again in this case, .5"). When you are confident that you have it in the right position, secure the length of casing to the bi-fold door with wood glue and micro-pinner.

8) Measure the top and bottom widths of each bi-fold door, and cut lengths of casing for the top and bottom of each door according to your measurements. Secure top and bottom pieces of casing to each bi-fold door (making sure ends are flush with edges of vertical casing pieces) with wood glue and micro-pinner.


9) Take the length of your vertical pieces of casing and divide by 5 to find the measurements of where to mark the interior space of each bi-fold door into 5 equal sections. Measure the width of each section, cut a piece of casing according to your measurement and secure to bi-fold door with wood glue and micro-pinner on your marks (you will want these to be in the same place for every door so that they all align properly).
10) Use DAP to fill all cracks and gaps. (See here for more information if you haven't done this before.)
11) Paint all closet doors with 1 coat of primer. Allow to dry.

12) Paint all closet doors with 2 coats of paint. Allow to dry.

13) Mark and drill coordinating holes for handles, and install handles (you will probably need to pick up some screws for your handles that are longer than the ones they came with, I used 1 3/4" machine screws)

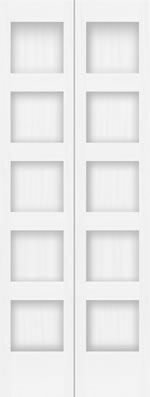
My DIY 5 Panel Shaker-style bi-fold closet doors for about $30 each!
Enjoy your "new," very affordable closet doors!
LOVE them Abby!!!!!
ReplyDeleteLove this!! Thanks for the idea!
ReplyDeleteI wonder how well this would/could work with sliding closet doors....?? the problem i could see would be to make sure they're not bulky so the doors could still slide past one another Hmm...
ReplyDeleteLove this though I never would have thought to do this!! I love giving things a facelift makes a HUGE difference Great Job!!
probably wouldn't work so well with sliding doors unless you could move the tracks to be further apart to accomodate the added thickness of the doors.
DeleteIt would probably be too thick to work on sliding doors but maybe not. Lowes (and probably home depot) carry an item in their mill work section that might work. It's very thin boards but not so thin as veneer-maybe 1/8-1/4"thick. Another idea would be too use textured wallpaper on the doors. They make that stuff that's supposed to resemble tin ceiling panels and it's meant to be painted. Dunno whether that would look good, just an idea that popped into my mind just now. I'm thinking if you did that, it would still need some kind of framing out to look not stupid.
Delete...the thin boards I mentioned are not casino, btw. The one I bought (for a different project) was maybe 10 or 12" wide. They would need to be cut to the proper width but the store would probably be happy to do that for you if you don't want to/can't. I bought oak but I'm pretty sure they have something cheaper like pine.
Deletecould you do the look with paint instead? that way they'd slide fine
Deletecould you do the look with paint instead? that way they'd slide fine
DeleteA brilliant solution to a rampant problem! Bravo!
ReplyDeleteI'm staring at my ugly flat kitchen cabinet doors and drawers. Thinking this could just work with smaller casing. Hmmmmm
ReplyDeleteLove this! I have the same type of ugly bi-fold doors (4 sets...ugh...), now i have a stylish solution - thanks!
ReplyDeleteAmazing! Love it, thanks for sharing!
ReplyDeleteAwesome! But the handle placement looks very off, you should have put them in the middle :)
ReplyDeleteThat's what I initially thought too - but you can't open the doors if the handles are placed in the middle. With a bi-fold door, the handles need to be placed at the hinge, or they won't pull open!
DeleteI think the handles look great just where they are, you really don't have any choice anyway.
DeleteThis sounds like a silly question, but what exactly is casing and where can I get it for about how much? I'm a new DIYer and moving into my first house and the master bedroom has those exact same doors and I've been trying to find a way to fix it and this is perfect!
ReplyDeleteThank you so much!
"casing" is just a term used for the trim that you usually find around windows and doors. Typically it's made of wood or MDF (I used MDF). You can find it at any Home-Depot / building supply type of store. Where I am in Canada, the plain casing material I used costs about $0.50 to $1 per linear foot depending on where you buy it - it's probably cheaper in the US.
DeleteWhat was the cost of adding the trim to the doors?
ReplyDeleteAbout $40.
DeleteDo you have a link to the trim? I tried to buy from home depot and they were asking $1.56 a square foot. Leading to about $100 to create this. Maybe I was purchasing the wrong thing? Please inform.
DeleteWhat a fabulous idea!! Thanks for sharing
ReplyDeleteWow! This is so beautiful!!! Perfect :)
ReplyDeleteI'm a new follower from pinterest! yay! Excited to check out your blog
Brie @ Breezy Pink Daisies
Love this...found you through Pinterest. Your newest follower.
ReplyDeleteAnissa from Chasing Hailey
http://chasinghailey.blogspot.com/
Love your blog! you have a new follower from Spain waiting for more brilliant ideas :D
ReplyDeleteHi my husband and I are looking forward to using your tutorial to update our closet doors. We are having a difficult time finding casing that is less than 1/2 in thick. Can you tell me the thickness of the casing that you used? I think the 1/2in will look good but he is hell bent on finding 1/4 in which I do not believe exists. Thanks!
ReplyDeleteI used 1/2" casing, I don't think 1/4" casing is very common, though it might exist somewhere. The only problem I had with 1/2" casing is that I had to buy some longer screws for my handles to accommodate the extra width in the door, but otherwise it has been great!
DeleteCatherine,
DeleteI've looked at using lattice for some cabinet doors. HD has some that is 1/4". Not sure if it's wide enough for you or not, but here it is. http://www.homedepot.com/Lumber-Composites-Moulding-Millwork/h_d1/N-25ecodZ5yc1vZ25ecodZbrdu/R-203461891/h_d2/ProductDisplay?catalogId=10053&langId=-1&keyword=lattice&storeId=10051#.UH7RHcUUWSo
Cute!! I found these doors for 29.99 at our ace on sale though! I'm sure these were cheaper, and look just as nice, I might add.
ReplyDeleteThat is a GREAT deal!
ReplyDeleteNice job on your doors - they turned out gorgeous! I have this linked to my closet doors post too today, well done!
ReplyDeleteLove this look! Well done with this project :)
ReplyDeleteWow! I am going to try this asap!
ReplyDeleteLOVE! Absolutely fabulous!
ReplyDeleteYears ago I did this to my kitchen cupboards, I have doors like this in my home, not sure why I had not thought of this for them..thanks
ReplyDeleteHello
ReplyDeleteI absolutely love the your doors! I wanted to know if you glued the trim on first then secured it with nails.Or can the trim be just glued on? What's a micro pinner? Is that a nail gun?
Yes, I glued them with wood glue and then pinned them to secure them in place. A micro-pinner is a small, light-duty brad-nailer (nail gun) that uses tiny 18 gauge "pins" instead of nails. You can use a regular nail-gun, but the beauty of using a micro-pinner for finishing work is that the holes left behind are teensy-tiny - and often don't require filling before painting.
DeleteClassy and elegant - I love it! I just don't know if I'd be able to cut the boards just so exactly that the result would turn out like this!
ReplyDeleteI loooooove this idea!! I have wanted 5 panel shaker doors forEVER, this is a perfect solution :)
ReplyDeleteHi! I'm here from 'Better After'.
ReplyDeleteI like your rendition better than your inspiration piece. Good for you for improving on the original idea!
Thank you for posting and appearing on Lindsey's site! I've added your blog to my A-List!
What a great job!!! WIsh I had thought of this at our last house which had several of these doors!
ReplyDeleteAHHHHHHHHH!!! I HAVE THOSE DOORS! I was going to just paint them white to match our freshly painted trim. But I am in. Love. with. your. doors!! Thank you so much, this is the best idea I've seen in a long time. YES!
ReplyDeleteWow! This totally makes me wish I had ugly closet doors to make over. :) You did an AWESOME job with this. Bravo!
ReplyDeleteI am pinning this and hopefully doing it! Thanks for the amazing inspiration!
ReplyDeleteOh my gosh, this is AWESOME!! Found you via Pinterest, and I just have to say that the outcome is amazing. :)
ReplyDeleteI love talking about Pantry Doors, I really don't know why.
ReplyDeleteTHIS IS UTTER GENIUS! I will be following your blog from now on!
ReplyDeleteAbsolutely beautiful!!! I hope to try and recreate them very soon. Thanks for sharing your talents!
ReplyDeleteThis is an excellent post, I am very interested by reading this.. Its very helpful yo us..keep posting such an interesting things.
ReplyDeleteSliding Wardrobe Doors
Keep up the good work, the whole makeover is just great and in much greater detail. Cool work.
ReplyDeletesliding doors interior
I love pantry doors because it maximize the space for short that's not just a door you may use the back part of it. Such a nice idea right? what do you think...
ReplyDeleteNow its looks nice after renovation of Pantry Doors
ReplyDeleteOMG I love you! I just discovered this tutorial on pinterest. I have been looking at those ugly doors for 14 years but could never convince hubby to fork out the money for new ones. I don't care what it takes, I am going to try this! Thank you so much!
ReplyDeleteI commend your creativity and ideas with this door by taking easy to obtain materials. That's amazing! Hopefully, I can do this in my Pantry Doors for my kitchen.
ReplyDeleteThis is EXACTLY what I've been wanting to do to my ugly bifold doors for a long time. I'm now inspired! This is a MUST DO!!!! Thanks so much for the tut!
ReplyDeleteThanks so much for this project! I did this to all my closets - five 8 foot floor to ceiling BEASTS! Let me tell you, they look awesome and transformed my condo! I just love them! I hired someone to do the carpentry and I did the finishing and painting. For about $1000.00 I did all the doors. Replacing them would have cost several times that amount. Thanks again for sharing your creativity.
ReplyDeleteOh, this makes me so happy to hear! :D
DeleteWe just bought our first house as a married couple.....and we have the same horrendous closet doors. I am definitely doing this! Who would have thought a little trim and some paint could make such an amazing change!
ReplyDeleteThanks so much for sharing and inspiring!
I’m definitely coming again to see these articles and blogs.http://e-sosa.com/
ReplyDeleteNicely done. Neat. home storage
ReplyDeleteI would have loathed those old doors if I had them in our house. You certainly did an amazing job with this project. Your new closet doors really look fabulous and expensive! This will surely inspire cabinets NJ lovers out there. How DIY can really save so much! Thank you for this inspiring post!
ReplyDeleteWow! Those look unbelievable! I'd love to do this to my bifold doors in Melbourne Victoria. I bet the materials were pretty cheap, too, huh? Thanks for sharing!
ReplyDeleteI love your all the creative ideas you are doing an inspiring works for us. Your all post shows how much is your visionary thinking. Me and my mom is an big fan of your blog and if want to renovate something in our home we will get all the concept and ideas from this amazing blog...Thanks for making these articles for us.
ReplyDeleteclosets NYC
Do you think i can do this if the doors are not all wood? My doors are not hard wood, any thoughts?
ReplyDeleteAs long as they're not metal I think you should be ok.
DeleteI cannot wait to try this I bought a great 1875 house that at some point went through a hideous 50's 60's reno..all doors are like the before pics ugly wood veneer, luan maybe. To replace them all in a 2400sq foot house I'd need a fourth job!
ReplyDeleteI jumped on this as soon as I saw it and already have my doors sanded! I'm having a hard time envisioning the proportions on my own bi-folds though. Please tell me the width of each of your panels and/or the total opening of your doorway?
ReplyDeleteEach panel is 1' wide and the total closet opening is 4'
DeleteThis is an awesome post.
ReplyDeleteFlush door Manufacturer in India
Those panels look so classy! I love the French door look it has. Great transformation! Thanks for the instructions. MUST try this now! :)
ReplyDeleteThanks,
Liz Ellsworth | http://amjwindows.com.au
I want to find a way to give my closet a makeover. I just finished decorating my room and now the doors are sort of an eye sore. Would anyone happen to know where I can find nice looking bifold doors in Melbourne? http://www.amjbifolds.com.au/bi-fold-doors
ReplyDeleteThis turned out great! I want to get bi-fold doors just like this for my closets in my house. We have sliding doors right now, but I like the way this looks better. You are able to see your whole closet at once with bi-fold doors. Thanks for this inspiration.
ReplyDeleteGary Puntman | http://www.amjbifolds.com.au
These bifold doors are really incredible. I would really love to have these in my home. The only problem is that my bifold doors are in worse conditions that yours. http://www.amjbifolds.com.au/bi-fold-doors
ReplyDeleteNice information about Bi-fold Door, thank-you for share
ReplyDeleteLove these! On my way to look for the trim but had a question. Did you paint the hinges? What about the sides and backsides of the doors?
ReplyDeleteAluminium bifold doors are a great choice to create a unique feature in any style of home. and this is nice blog.
ReplyDeleteWhere did you get the flat casing? I can't find anything that wide that is completely flat. I love this idea and really want to do it....thanks
ReplyDeleteFirst You got a great blog .I will be interested in more similar topics. i see you got really very useful topics, i will be always checking your blog thanks. check over here
ReplyDelete
ReplyDeleteThank you so much for sharing such an awesome blog...
upvc windows and doors
upvc windows and doors dealers
Thank you so much for sharing such an awesome blog...
upvc doors and windows manufacturers
upvc doors and windows suppliers
This comment has been removed by the author.
ReplyDeleteGood information nice stuff thank you so much for sharing this awesome blog
ReplyDeleteupvc balcony sliding doors in Hyderabad
https://www.sudhakarind.com/
I just came across this wonderful idea while looking for laundry room door ideas. when we moved into this house it was filled with these ugly doors in all forms--louvered, half-louvered, paneled, and flat just like these. We've gradually gotten rid of them over the years, but still have a set on one of the kids' bedrooms, mainly because they're so heavy they block out the most noise. I never thought of this, although I did something similar on some flat panel kitchen cabinets with 2 inch casing and beadboard-look wallpaper. This is definitely my next project. Thank you SO much for sharing your work!!!
ReplyDeleteThe new doors have so much more character! I love it. Unfortunately for my family, my decorating skills are even less developed than my cooking abilities…and that is a scary thought! Just like when I did with our Bifold Doors Sydney house.
ReplyDeletethank you for sharing through this blog.. You may also like My work: Grout and Glass restoration products
ReplyDeleteGood website! I truly love how it is easy on my eyes and the data are well written. windowcleaningwellington.com
ReplyDeletenice one
ReplyDeleteSliding Door Security Bar
It is really a helpful blog to find some different source to add my knowledge.
ReplyDeletebuilt in wardrobes sydney
Sliding bifold doors combine the space-saving benefits of sliding doors with the flexibility of bifold panels. They offer a modern, stylish solution for maximizing space and enhancing indoor-outdoor connectivity.
ReplyDeleteRead more:
Sliding Bifold Doors: Installation & Repair
Sliding bifold doors provide a stylish and space-saving solution for homes. Proper installation ensures smooth operation, while regular maintenance and timely repairs prevent issues like misalignment, sticking, or damaged tracks for long-term functionality.
ReplyDeleteRead more:
How to Repair Sliding Bifold Doors Effectively
Sliding bifold doors combine the space-saving benefits of sliding doors with the versatility of bifold designs. They offer smooth operation, modern aesthetics, and excellent functionality for both residential and commercial spaces.
ReplyDeleteRead more:
Top 7 Tips for Choosing Bifold Doors in London
Bifold screen doors are a stylish and space-saving solution, offering smooth operation, excellent airflow, and insect protection while enhancing the aesthetics of your home’s entryway or patio area.
ReplyDeleteReally impressed by how your Bi folding doors blend indoor & outdoor spaces so seamlessly. The track system looks super smooth and the design is sleek.
ReplyDeleteMid Land Shopfront Ltd is a trusted company known for its expertise, reliability, and high-qualityshopfront and glazing solutions. They specialize in creating designs that not only enhance the look of a property but also add long-term value and functionality. One of their standout offerings is their excellent range of Bifold Doors & Windows, which combine style, practicality, and durability.
ReplyDeleteBifold Doors & Windows are a perfect choice for both residential and commercial properties, allowing maximum natural light, seamless indoor-outdoor flow, and a modern aesthetic. Mid Land Shopfront Ltd ensures every installation is completed with precision, using strong, high-quality materials that guarantee security and long-lasting performance. Their attention to detail and craftsmanship make their products stand out in both design and usability.
What really sets Mid Land Shopfront Ltd apart is their customer-first approach. From the initial consultation to the final installation, their team works closely with clients to deliver tailored solutions that perfectly match individual requirements. They are professional, friendly, and always committed to exceeding expectations.
For anyone looking to upgrade their property with stylish, durable, and practical solutions, Mid Land Shopfront Ltd’s Bifold Doors & Windows are a fantastic investment that combines elegance with functionality.
Louvered Closet Doors offer excellent ventilation while maintaining privacy and style for storage spaces. With Industrial Roller Shutter Door, you get high-quality, durable, and customised louvered doors designed for long-lasting performance. They are ideal for homes, offices, and commercial properties, improving airflow and overall interior appearance. Visit Our Website for More information:
ReplyDeleteThis comment has been removed by the author.
ReplyDeleteThis $30 Shaker-style transformation is incredible! I love how you used a micro-pinner for clean lines. While DIY is great for makeovers, for full-scale replacements, I recommend professional interior doors installation long island to ensure perfect structural alignment.
ReplyDelete